Vids (Videos)
Create your first video in Google Vids
Create a video using the “Help me create” feature
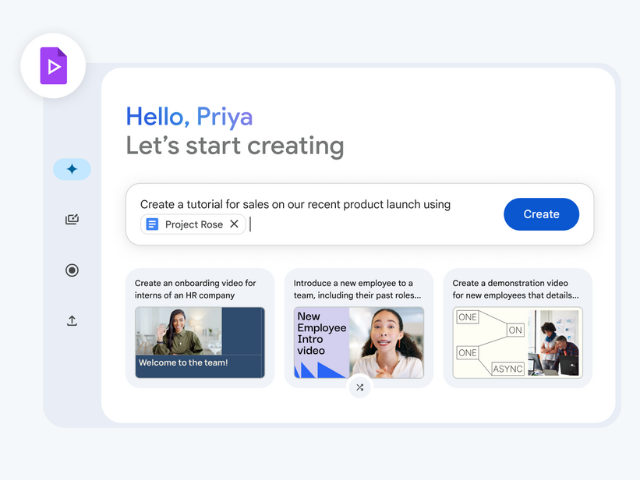
You can use “Help me create” to generate a video draft with Gemini in Google Vids. You only need to enter a description. Gemini then generates a draft, including a script, AI voiceover, scenes, and content for the video. Afterward, you can edit the draft as needed.
- On your computer, open Google Vids.
- In the Gemini window, click “Help me create” if you’re not already on that tab.
- Describe the video you want to create. Include information such as the audience, purpose, and tone of the video.
- Optional: To generate examples, click the prompt suggestions below the description box.
- To add related files, type @, then type a file name or select a file from the dropdown list. You can add Google Workspace files, such as Docs, Sheets, or Slides, from Google Drive.
- To generate new prompt ideas, click the shuffle icon below the suggestions.
- Optional: To generate examples, click the prompt suggestions below the description box.
- When you’re satisfied with your description, click Next.
- Review and edit the proposed outline, or rewrite your prompt to generate a new outline, then click Next.
- Select a layout, then click Create video draft.
- When your video is created, you can add and customize the content as needed.

Edit or customize your AI-generated video
After creating your video, you can review or edit the generated voiceover scripts and customize media placeholders.
Verify or edit generated scripts or voiceovers
- To open the script panel and view or edit your generated scripts, click Scripts.
- When you use “Help me create,” a script and voiceover are generated for each scene. To edit them, you need to replace each audio object. To add your own audio to specific scenes:
- Delete the voiceover audio track from the scene where you want to remove the narration.
- Add a new voiceover manually or with AI. When you generate a voiceover, it uses the content from the script panel. Learn how to create scripts and voiceovers in Google Vids (Workspace Labs).
Customize media placeholders
In your video, you might find media placeholders.
- Circular media placeholders contain stock voiceovers. You can replace them with live voiceovers.
- Larger media placeholders include an “Add your media” label. You can replace them with your own media.
- Optional: To replace the media in these placeholders, click “Select a video” to open a dropdown menu that includes:
- Upload
- Generate an image
- My media
- Stock media
- Optional: To replace the media in these placeholders, click “Select a video” to open a dropdown menu that includes:
- To add media from the recording studio and add a recording, click Record.
- To keep the originally added media in the placeholder, click Keep video.
Start with a template
A template is a pre-designed set of scenes with media and transitions. Use a template to outline your video, then customize it as needed.
- On your computer, open Google Vids.
- In the Gemini window, click Templates.
- Select a template from the gallery.
- Choose whether to insert all scenes or only the current scene.
- When your video is created, you can add and customize the content as needed.
Start by recording a video
Build your video by recording yourself (audio narration or full video recording), your computer screen, or your surroundings using the Vids recording studio. You can preview the recording and re-record until you like it. Then, you can insert it into your Vids file and customize it as needed.
Note: Recordings you create in Vids can be up to 10 minutes long.
- On your computer, open Google Vids.
- In the Gemini window, click Record.
- When you’re ready, click “Record now,” then click Start.
- When you’re finished, click Pause, then click Preview in the corner of the recording window.
- When you’re ready to add your recording to a scene, click Insert, or click Restart to record again.
- When your recording is added, you can customize it as needed.

Start by uploading your own content
You can start by uploading your own content. You can still generate images using Gemini, add clips using the recording studio, and add content from templates later.
- On your computer, open Google Vids.
- In the Gemini window, click Upload.
- Click “Browse on computer,” then select the file you want to start with. You can add more content later.
- When your video is created, you can add and customize the content as needed.

Build a video from scratch
You can go directly to the Vids timeline and start creating your video from scratch. You can still use the recording studio and add content from templates later.
- On your computer, open Google Vids.
- To go to the video timeline, click the X in the top right corner.
- On the timeline, add and customize content as needed.

Add narration, music, and multimedia
Record narration and video clips
In Google Vids, you can:
- Record narration and video clips
- Generate narration using AI
Record narration and video clips
You can also record an audio narration or webcam recording, your computer screen, or your surroundings using the Vids recording studio.
Note: You can add up to 50 audio objects (counting individual music clips, sound effects, or voiceovers) per video. Limits are subject to change.
- On your computer, open a video in Google Vids.
- Select the scene where you want to add the recording.
- In the side panel, click Recording.
- In the recording studio pop-up window, allow your browser to access your camera and microphone.
- Select a recording option:
- Camera — Record video and audio from your computer’s camera and microphone.
- Camera and screen — Record video and audio from your computer’s camera, microphone, and screen.
- Audio and screen — Record your computer’s screen and system audio.
- Audio — Record only audio from your computer’s microphone.
- If you’re using a script, select a teleprompter option:
- Read along — Vids highlights the script as you read and scrolls to match your reading speed.
- Continuous — Vids scrolls the script at a constant speed.
- Manual — Scroll the script yourself using the up and down arrow keys on your keyboard.
- When you’re ready, select Start recording at the bottom of the screen.
- When you’re finished, select Pause recording at the bottom of the screen.
- Click Preview and then Insert.
Generate narration using AI
You can select an option to generate an AI voiceover for one scene at a time, or for all scripts at once.
- On your computer, open Google Vids.
- To open the script side panel, in the sidebar, click Scripts or at the top click View and then Show scripts.
- Choose an option:
- To generate an AI voiceover for all scenes:
Important: If you generate a voiceover for all scenes, any previously generated voiceovers will be replaced with the newly generated ones. This will not replace voiceovers that you have recorded yourself. By default, scenes will extend to match the voiceover duration. To change this, you can turn off Extend scenes to match voiceovers.
- To show all scene scripts, at the top of the script side panel.
- At the bottom of the side panel, click Generate voiceover.
- To generate an AI voiceover for the current scene:
- To show the current scene’s script, at the top of the script side panel.
- At the bottom of the side panel, click Generate voiceover.
- When the voice selector appears, select a voice.
- To preview the voiceover, click Play.
- Add the voiceover:
- To add a voiceover for one scene, click Insert into timeline.
- To add a voiceover for all scenes, click Add voiceovers to all scenes.
Tip:
You can only generate a voiceover in English. The voiceover only supports plain text, no emojis or symbols.
Scripts you use to generate a voiceover cannot exceed 2500 characters.

Add music and sound effects
You can add your own audio files to your video — including sound effects, music, and other audio recordings — from your computer or Google Drive. Audio tracks can span multiple scenes, and tracks can play at the same time, such as voiceovers and background music.
You can add up to 25 audio tracks per video.
- On your computer, open a video in Google Vids.
- On the timeline, move the playhead to where you want to add the audio clip.
- Add a file:
- From your computer: In the top menu bar, click Insert and then Upload.
- From your Google Drive: In the top menu bar, click Insert and then My media.
- Select the file you want to add. A track for the audio clip is inserted at the playhead’s location.
- Customize the clip’s sound and transitions as needed.

Insert generated images
You can add Gemini-generated images to your videos.
- On your computer, open a video in Google Vids.
- In the side panel to the right of the canvas, click Generate an image.
- In the search box, describe the image you want to generate. For best results, include the subject, setting, materials, or background. For example:
- A Hawaiian beach at sunset with palm trees in the distance.
- A plate of freshly baked blueberry muffins on a wooden table by a large window.
- A futuristic city at night with skyscrapers and flying cars, HD details and shadows.
- Optional: To specify the type of image you want, such as a photo or drawing, click Add a style.
- To generate suggested images, click Create.
- To insert a generated image, click the image.

Insert stock images and clips
You can add stock video, images, music, sound effects, stickers, and GIFs to your videos.
- On your computer, open a video in Google Vids.
- In the side panel to the right of the canvas, click Stock media.
- In the search box, enter a description of what you’re looking for or search for a specific media type.
- Click an item to add it to the canvas.
- Tip: Stock videos, images, music, sound effects, stickers, and GIFs are inserted at the beginning of the scene. Audio clips are inserted at the playhead’s location (the blue graphic line on the video timeline).

Upload media from Drive, your computer, or the web
You can add media from Google Drive, your computer, or the web to your videos.
- On your computer, open a video in Google Vids.
- On the timeline, select the scene where you want to add the item.
- To upload an image from Google Drive:
- In the Vids menu bar, click Insert and then My media.
- Select the file you want to add.
- To upload an image or video from your computer:
- In the Vids menu bar, click Insert and then Upload.
- Select the image or video you want to add.
- To drag an image from your computer or the web:
- On your computer or website, locate the image you want to add.
- Drag the image to a scene in your video.
- To copy and paste an image from your computer or the web:
- On your computer, right-click the image you want to add.
- Click Copy.
- In your video, right-click a scene and choose Paste.
Tip: It might take a moment for the image to open, depending on the image size and internet connection speed.

Add text, lines, and shapes
You can add text, including stylized text blocks, as well as lines, shapes, and other objects to your videos.
- On your computer, open a video in Google Vids.
- Select the scene where you want to add text or an object.
- In the side panel to the right of the canvas, click Text or Shape & Line.
- Click the object you want to insert, then modify, arrange, or format it as needed.

Customize timings, transitions, and audio.
Control how long objects appear in a scene.
Each object (text box, shape, line, image, GIF, sticker, or video clip) has its own object track at the bottom of the Vids window. Use the object track to control how long objects appear in a scene.
- On your computer, open a video in Google Vids.
- To show an object’s track, select the object and then click above the timeline.
Tip: To change the timing of multiple objects at once, press Shift and click the objects you want to select. Or drag your cursor over multiple objects to select them all.
- To shorten or lengthen object timings:
- Point to the left or right edge of the object’s track.
- When the blue handle appears, click and drag the handle to adjust the duration.
Tip: Above the timeline, click to preview the timing.
- To change when an object appears in a scene, click and drag the object’s track left or right.
Tip: This only works if the object track is shorter than the scene.
- To close the timing view, click
.

Animate objects in and out.
To add visual interest or emphasis, you can animate objects into and out of a scene. Without animation, objects simply appear and disappear based on their timings.
- On your computer, open a video in Google Vids.
- On the canvas, click the object you want to animate.
- In the Animation panel on the right, select an animation, such as Fade. A preview of the animation will play when you click it.
- To apply the same animation when the object enters and exits the scene, click Enter and exit and then choose an animation.
- To choose different entry and exit animations, click Separate entry and exit animations at the bottom of the side panel and then choose the animations using the tabs at the top:
- Enter: applies the animation only when the object enters the scene.
- Exit: applies the animation only when the object exits the scene.
- For some animations, you can also choose these options:
- Duration: how long the animation takes to complete.
- Direction: the animation’s path into or out of the scene.

Customize the volume, transitions, and timing of audio clips.
You can customize the volume, fade transitions, and timing of audio clips. You can also overlap audio tracks so they play at the same time, such as a narration over music.
- On your computer, open a video in Google Vids.
- On the canvas, click the audio track you want to adjust.
- Tip: You can also right-click the audio track and then click Format options.
- In the Sound options panel on the right, adjust the audio clip.
- To adjust the timing of an audio track, drag the track left or right.

Customize the format of video clips.
You can customize how video clips play, including their timing, volume, transitions, position, and more.
- On your computer, open a video in Google Vids.
- On the canvas, click the video clip you want to customize and then click
.
- Tip: You can also right-click a video clip and then click Format options.
- In the Format options panel on the right, adjust the video clip’s settings.

Adjust image formatting.
You can change the size, position, color, and other formatting elements of the images in your video.
- On your computer, open a video in Google Vids.
- On the canvas, click the image you want to adjust.
- Tip: You can also right-click the image and then select Format options.
- In the Format options panel on the right, adjust the image settings.

Share and collaborate on videos
Share your video for comment and review
Allow up to 100 people to view, edit, or comment on your video at the same time. To allow more than 100 people to view your file at the same time, download or export the video and share it instead.
Note: Your organization might limit how you can share files.
- On your computer, open a video in Google Vids.
- In the top right corner, click Share.
- Enter the email addresses of the people you want to share with.
- To decide what role people will have on your file, select Viewer, Commenter, or Editor.
- Optional:
- To notify people by email, check the Notify people box and then add a message.
- If you don’t want to notify people, uncheck the box.
- If you use an eligible work or school account, click Add expiration to add an expiration date.
- Click Send or Share.
- Tip: If you use your Google account for work or school, you can choose to share files and folders only with a specific audience, such as your department. You might find a description of each audience when you hover over the group name.

Comment on a video
- On your computer, open a video in Google Vids.
- Highlight the content you want to comment on. In the toolbar, click Add comment Add comment.
- Type a comment and then click Comment.

Stop sharing a video
- Stop sharing a video you own
- Find the video file in Google Drive or Google Vids.
- Open or select the file or folder.
- Click Share or Share Share.
- Find the person you want to stop sharing with.
- To the right of their name, click the down arrow and then Remove access.
- Click Save.

Remove a link to a video you own
- Find the video file in Google Drive or Google Vids.
- Open or select the file or folder.
- Click Share Share or Share Share and then Copy link.
- Under General access, click the down arrow.
- Select Restricted.
- Click Done.
Share a finished video for viewing
- To share a finished video, download it to your computer as an MP4 or upload it to your Google Drive and then share it as needed.
- On your computer, open a video in Google Vids.
- Save the file:
- To save the file to your computer, click File and then Download as MP4.
- To save the file to your Google Drive, click File and then Export to Drive.
- Upload the file to a video sharing app or share the video from Drive.
Share a video as a template
You can convert any Vids video file into a template and share it with people in your organization. This helps creators keep video content aligned with brand standards.
- On your computer, open a video in Google Vids.
- Open the Vids video file you want to use as a template.
- Click File and then Make a copy and then Entire video.
- Rename the file to indicate it’s a template. For example:
- Cymbal Company Video Template
- Click Share or Share.
- Change the access type for all users to Viewer.
- Click Copy link and then Done.
- Paste the link into your preferred communication channel, such as an email or chat message.
- In the link, change /edit to /copy.
When people open the link, they’ll have the option to make a copy of the template, which they can then edit and use for their projects.